I live in jeans 365 (pretty much!) and always have a pair or two to cut up.
Denim is such a great material to recycle and is strong and durable enough for handbags. I made a few of these crazy patchwork ones last year for a bag sale, and loved how they turned out (they sold really well too!).
I've also used different coloured denim for a weekend bag which I'm currently teaching in class. I even used the tie belt from one pair of jeans to make the handles!
I've even used denim in cushion making, although I don't recommend mixing denim with lighter weight fabric scraps. Keep everything to the same weight and you'll be fine!
Other uses for denim I've found are doorstops - again strong and strudy for such a heavy object.
I'm afraid charity shops don't ever get my discarded jeans now!
Monday, 21 February 2011
Saturday, 19 February 2011
Bethany's Cushion & Flickr Pics!
I have succombed even more to this technological age and set up a photo stream on Flickr (you'll find a button on my blog which should link directly to it). Flickr is a great place to 'surf' for inspiration on a vast range of crafts & projects.
As I was uploading some pics I was reminded of a cushion I made recently which I haven't yet blogged about.
My youngest daughter's favourite colour is green; she even got her bedroom decorated green & white last year!
I'd already made her a log cabin cushion for her bed, to match her new bed linen ......
..... but thought a floor cushion would come in handy for the many hours she spends playing with toys on her bedroom floor!
I had seen a lovely quilting technique on the web (sorry can't remember where - if I come across it I'll put a linky in here!) & wanted to try it out so thought of doing it floor cushion size (24") for Bethany's bedroom.
The strips were foundation pieced onto the wadding, so the piecing and quilting all happened at the same time. I then outline quilted the strips with a variegated thread (not so obvious in the pics) which was a new, decorative technique for me. I really like this effect, especially against a plain while background.
Bethany loves her cushion and drags it around the house to sit on wherever she goes. Needless to say it won't stay white for very long!
As I was uploading some pics I was reminded of a cushion I made recently which I haven't yet blogged about.
My youngest daughter's favourite colour is green; she even got her bedroom decorated green & white last year!
I'd already made her a log cabin cushion for her bed, to match her new bed linen ......
..... but thought a floor cushion would come in handy for the many hours she spends playing with toys on her bedroom floor!
I had seen a lovely quilting technique on the web (sorry can't remember where - if I come across it I'll put a linky in here!) & wanted to try it out so thought of doing it floor cushion size (24") for Bethany's bedroom.
The strips were foundation pieced onto the wadding, so the piecing and quilting all happened at the same time. I then outline quilted the strips with a variegated thread (not so obvious in the pics) which was a new, decorative technique for me. I really like this effect, especially against a plain while background.
Bethany loves her cushion and drags it around the house to sit on wherever she goes. Needless to say it won't stay white for very long!
Saturday, 12 February 2011
Table Topper
March is going to be table runner month for my classes (also called table toppers).
I've had a jelly roll sitting about my sewing room for some months now, thinking I'd 'save' it for a quilt one day (that day never arrived!). I finally plucked up the courage to pull the ribbon and unfold the roll. Only fellow quilters will understand the sheer delight of experiencing jelly rolls! The revelation of colours and patterns, all coordinated, demanding to be created into a feast for the eyes (not to mention pre-cut strips - yeah!).
Anyway, I decided to create an easy table topper using some of my jelly roll. This pattern is really easy and will be suitable for all abilities. I took my lead from the table runner tutorial posted on Diary of a Quilter which shows you how to use up lengths of scraps.
I still have loads of strips left over (although only half a purple strip left as the binding used up most of those). My daughter thinks the prints are very funky so I might make her something with the leftovers.
I've had a jelly roll sitting about my sewing room for some months now, thinking I'd 'save' it for a quilt one day (that day never arrived!). I finally plucked up the courage to pull the ribbon and unfold the roll. Only fellow quilters will understand the sheer delight of experiencing jelly rolls! The revelation of colours and patterns, all coordinated, demanding to be created into a feast for the eyes (not to mention pre-cut strips - yeah!).
Anyway, I decided to create an easy table topper using some of my jelly roll. This pattern is really easy and will be suitable for all abilities. I took my lead from the table runner tutorial posted on Diary of a Quilter which shows you how to use up lengths of scraps.
I still have loads of strips left over (although only half a purple strip left as the binding used up most of those). My daughter thinks the prints are very funky so I might make her something with the leftovers.
Friday, 11 February 2011
40 Shades of Green!
A good friend of mine was celebrating her big 40 this month and was throwing a '40 shades of green' themed party. Sadly I was unable to attend the party so thought I'd make Angie something that contributed towards her creative theme.
I foundation pieced 40 different green fabric scraps onto a free hand drawn template, bondawebbed them down onto a plain background and then satin stitch appliqued them on. I was delighted with the result and even more so that Angie loved it too!
Happy birthday girl! Life begins at 40!
| The birthday girl! |
I foundation pieced 40 different green fabric scraps onto a free hand drawn template, bondawebbed them down onto a plain background and then satin stitch appliqued them on. I was delighted with the result and even more so that Angie loved it too!
Happy birthday girl! Life begins at 40!
Thursday, 10 February 2011
Classes Update - Well done everyone!
Both my classes have just finished their first projects. They all did really well and I hope they are as proud of their achievements as I am!
Thursday evening class: Project - Floor cushion
Well done girls! I hope to post a few more pics of those who were finishing theirs off at home.
Friday Morning Class: Project - Log Cabin Cushion & pot holder
Isn't it wonderful how a change of fabric can transform & individualise items. Well done girls! I hope you enjoy your new creations. And don't forget to show them off!
Thursday evening class: Project - Floor cushion
![]() |
| Working hard! |
![]() |
| Oh the concentration! |
![]() |
| Always time for a smile! |
![]() |
| Gorgeous! |
![]() |
| Classey! |
![]() |
| See more of this one at Sew Me |
![]() |
| Stunning! |
| Patricia's Vintage Chic! |
![]() |
| Marion was so chuffed about putting a zip in her cushion, we are going to call her 'Zippy' from now on! |
Friday Morning Class: Project - Log Cabin Cushion & pot holder
| Golden Glory! |
| Recycled Chic! |
| A Denis & Dan delight! |
| Funky Caterpillar Pot Holder! |
| Beautiful blues! |
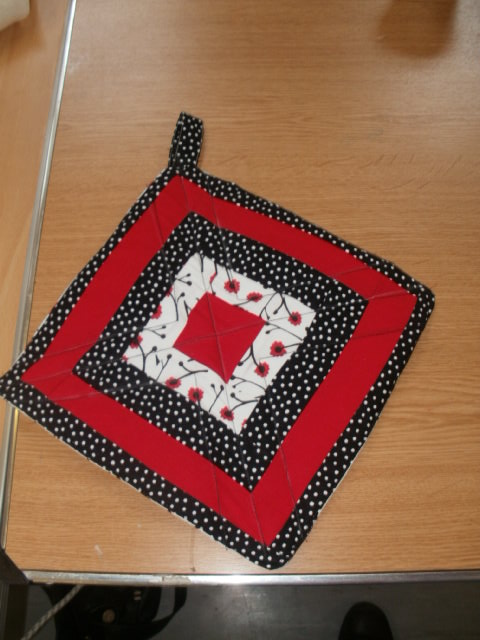
| Stunning red & black pot holder |
| Calming green! |
| Elegant lilac & yellow! |
Wednesday, 9 February 2011
Eye Spy!
I love the concept of 'Eye Spy' quilts for children (& adults!). I have this dreamy fantasy of sitting with a little one on my knee, playing 'eye spy' while finding the different pictures in the quilt lovingly draped over the 2 of us!
| Examples of Eye Spy Quilts from the web |
About a year ago I started keeping my eye out for any fabrics that had a picture on it, from leaves & flowers to instruments & animals. My box is starting to overflow now so I've started fussy cutting some of what I've collected into 2.5" and 4" squares.
No idea yet how this thing will evolve, needless to say as my 'baby' will be 10 years old this year, it will probably be ready for the first grandchild, which better not be within the next 10 years!
Subscribe to:
Posts (Atom)