
You can find previous tutorials here:
Easter Bunny Bags
Easter Baby Bibs
Carrot Cornets
Apologies if you have had trouble downloading the PDF templates. I have amended the 'sharing' settings within GoogleDocs so I hope from now on you will find it a little easier. Please don't hesitate to get in touch otherwise.
One final bit of housekeeping before we move on to another Easter tutorial. I'm always grateful to folks who take the time to leave a comment here on my blog. I will ALWAYS reply to comments, so if you don't get a response from me, it's because your email address doesn't register with your comment. In blogging terms you are known as a 'no reply comment' blogger. If this is you, I would love to be able to connect and chat with you more, so here and here are some tips you can try to fix your settings. Alternatively, just leave me your email address with your comment (especially important when entering giveaways!).
On to our next Easter Tutorial!
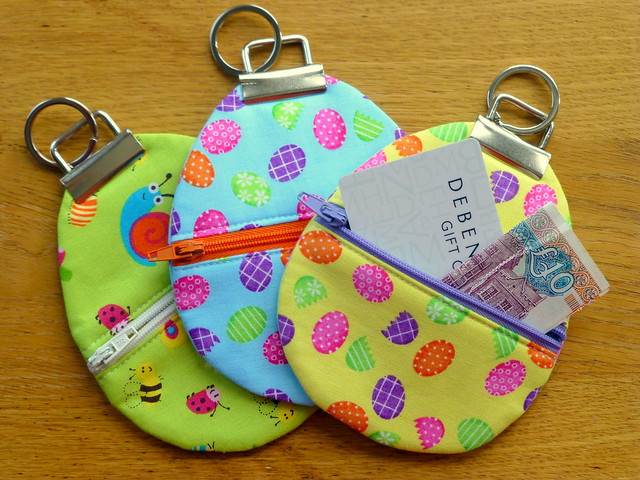
Easter Egg Zippy Pouches!
This one is for older (or grown up) kids! As you can see, this is a fun way to gift money or vouchers!
And here's how to make them:
What you need:
Front:
From outer and lining fabrics & sew-in vilene (med/heavy) cut 2 x (5" wide by 3.5" tall)
Back:
From outer and lining fabrics & sew-in vilene (med/heavy) cut 2 x (5" wide by 6" tall)
5" plastic zipper (or longer)
1.25" wide key fob
Basting spray 505
Zipper foot
Assume 1/4" seams
Download the 'Egg' template here.
1. Spray baste the vilene to the wrong sides of the corresponding outer pieces.

2. Place the zipper right sides together along the top edge of a 5" x 3.5" outer/front piece.

3. Pin a corresponding lining piece on top, right sides together with the outer fabric.

4. Using the zipper foot, sew through all layers.

5. Flip the lining over to the back and press away from the zipper. From the front side, sew 1/8" finishing seam beside the zipper.

6. Now lay the other outer (front) piece on the table, right side facing. Place the zippered piece right sides together with the zipper aligned at the top edge.

7. Pin the remaining corresponding lining piece on top, right sides together with the attached lining piece. Sew through all layers as before.

8. Again flip the lining to the back side, press and sew a finishing seam 1/8" away from the zipper. Your pouch front should look something like this.

9. Place the template onto the lining side and draw around with a pencil. Before cutting out on the line, bring the zipper pull inside the pouch and sew a few stitches across the zipper (just inside the line) to secure.


10. Place the outer/vilene back piece WRONG sides together with the corresponding lining piece.

11. Place right sides together with the egg front. Pin and sew 1/4" inside the edge.


12. Trim away the excess and zigzag the raw edges.


13. Turn the pouch right side out through the zipper and press well.

14. Attach the keyfob & ring to the top of the 'egg'.

Stuff with money, goodies (or diamonds!) and gift to your favourite big person!!
Happy Zipping!
Jude xo
That's s great idea! Thanks for sharing xxx
ReplyDeleteOh imagine one filled with diamonds! Though I'd just settle for chocolate. Very cute idea.
ReplyDeleteThis comment has been removed by the author.
ReplyDeleteHope one of these is for me mum!!
ReplyDeleteThanks Jude - a brilliant idea and perfect tutorial. x Jo
ReplyDeleteThis is one to Pin, thanks Judith.
ReplyDelete