Friday, 14 December 2012

Last Class of 2012

Today saw the end of my classes for 2012!

It has been an amazing year of teaching and pattern writing for me, working through the summer, progressing to 4 weekly classes, and getting a wee Etsy Pattern shop up and running.

I still feel so privileged and touched that folks want to come to my classes and learn from me! I still have much to learn, but I love what I do!

Here are a few mosaics to round up the last few weeks of classes.  What an amazing bunch!

Brooches Classes Dec12
The brooches made by my 2 Brooches Classes

Kids Stocking Workshop Dec12
Kids Christmas Stocking Workshop
Christmas class Dec12
Adults Christmas class
 
And our final Bee Blessed of 2012 meets tomorrow. 
 
Just one more week of work and I'll be switching off the old grey matter for a few weeks! 
 
Now I can turn my attention to the small matter of Christmas shopping (groan!).
 

Wednesday, 12 December 2012

Party Clutch!

Yesterday I told you about a little one's first birthday in December, and the hexie tote bag I made for her.

Well her big sister also has her birthday in December!  She will be 17!

So into the birthday parcel went a Party Pouch, which may come in useful for lots of Christmas parties!

Hannah's Party Clutch Dec12

Now this particular young lady really likes black and dark colours, but I have virtually no black fabrics in my stash. 

But I found this black remnant from something or other, which has a lovely embossed pattern on it, and I'm really hoping she doesn't mind that shot of hot pink I couldn't resist putting in (Oakshott silk). 

I finished it off with a vintage brooch, which she can easily detach if it's just too much bling!

Phew!  Another December birthday ticked off the list!  I have had quite a few!

Tuesday, 11 December 2012

Tote for a Tot!

My friend gave birth to a gorgeous girl last December, and to help little one celebrate her special 1st birthday, I've made her a tote bag to carry dolly around in! 

A girl can never have too many bags, and it's never too young to start, right?

Natasha's 1st Birthday Tote bag

I acquired a Sizzix Big Shot a few months back, and decided that hubby really wanted to buy me a few more dies for it for Christmas!! One being the 1" Hexie die.  (Yes I opened my Christmas present the moment it arrived! Naughty!)

I ironed bondaweb onto the back of some pink and blue fabric scraps before whizzing them through the Big Shot like a magic whizzy thing!

I then ironed the hexies onto some linen and satin stitched them securely, so no amount of dragging around the floor will unhinge them! 

I went for a practical denim bottom too on this tote, and as the family have recently got a puppy, I thought Aneela's playful pups for the lining was perfect.

And at the last minute, I discovered that cute wee teddy in my ribbons box.  Perfect!

So dolly is now snug and secure, at least until some tiny hands starting flinging her around! I hope teddy's head doesn't get chewed off (by baby or the puppy!).

Monday, 10 December 2012

Twin Needling with Oakshott

If you read Lynne's blog (Lily's Quilts) you will know that her sponsors regularly give out fabric to folks who can come up with creative ways to use and promote their fabrics.

My suggestion to use some glamorous Oakshott Silks in a Twin Needling Stained Glass project was chosen and I was very kindly asked to write a tutorial.

And here it is! 

Twin needling is sewing with 2 needles in your machine, and 2 spools of thread, at the same time!


When you get the hang of this technique, it is so much fun, and the possibilities are endless.

The most common way to use twin needling to great effect is in Stained Glass Windows patchwork:

Twin Needling Tutorial Dec12

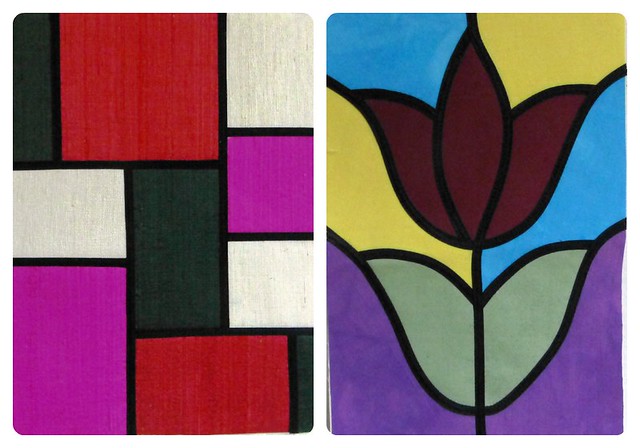
The bit that you are twin needling is the 'leading' otherwise known as Fusible Bias Tape

Twin Needling Tutorial Dec12

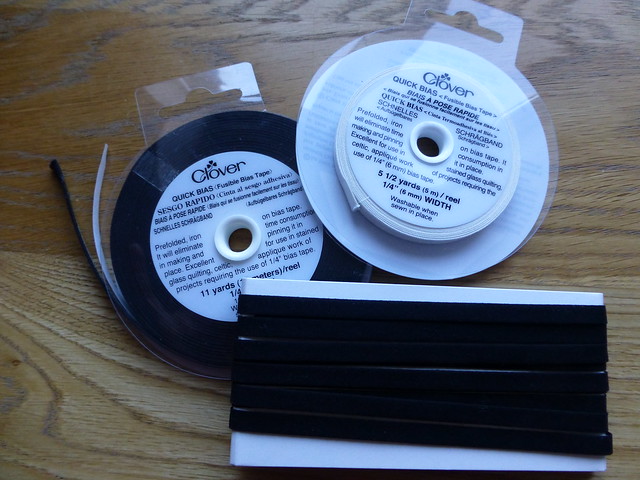
This is such a cool product and worth every penny.  It comes in different colours & widths, but I use the 1/4" tape with a 1/4" twin needle (twin needles also come in different widths).  And because it has been made on the bias, it curves really nicely! 

So here's how you twin needle!

Ever wondered what the extra spool holder & hole was for in your machine?  As well as the hooks on the sides of your needle shank? Yep, you guessed it!  Twin Needling.

Twin Needling Tutorial Dec12

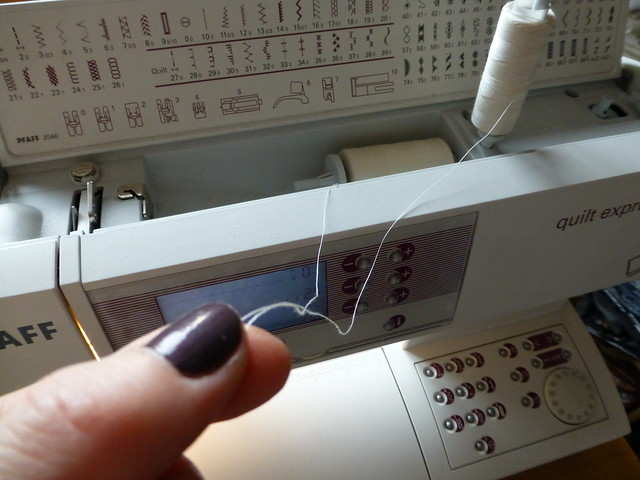
Put 2 spools of thread into the top of your machine.  Some of you may have spool holders that are permanently fixed on the top of your machine, some of you may have one that is fixed and a hole to slot in your spare spool holder.

Now take both threads together, and thread your machine as normal, until you get to the needle shank.

This is where you separate the threads again.  Hook one thread to one side, and the other thread to the other side.

Twin Needling Tutorial Dec12

Insert your twin needle unit in the same way you put in a normal needle and thread each needle.

You should now have 1 bobbin thread and 2 top threads.  Increase your stitch length to 3.

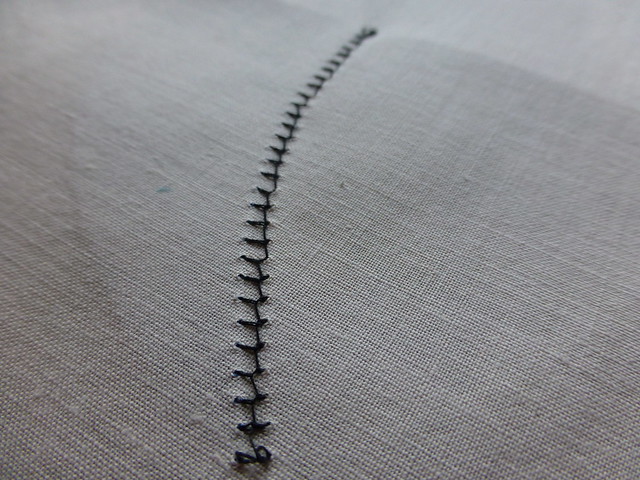
Iron a small piece of fusible bias tape onto a scrap of fabric (always double your fabric) & practise your twin needling until you get the tension right (you may need to loosen your tension as the fusible tape is quite thick).

This is what it should look like on the back:

Twin Needling Tutorial Dec12

Now you are ready to twin needle your project.

There are 2 ways to do Stained Glass Windows:

1. Using bondaweb to stick down your design and then twin needle the 'leading' on top (check the compatibility of the bondaweb with the fabric you are using).

Twin Needling Tutorial Dec12

This method is good for more intricate, curved designs.

2. Make an improve patchwork block and twin needle the 'leading' onto the right side of the seams.

Twin Needling Tutorial Dec12

What you must remember when making stained glass patterns, is the raw edges of a length of bias tape must be hidden underneath another length of bias tape (rather like foundation piecing where the last raw edge gets sewn over by the next piece of fabric).

Method 2 is a good way to start twin needling if you are a first timer!

Here are the picture steps for Method 2 followed by the tutorial:

Twin Needling Tutorial Dec12

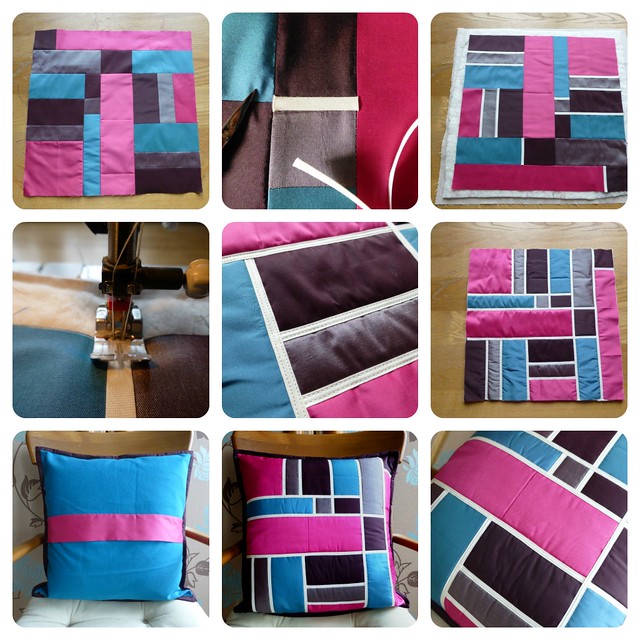
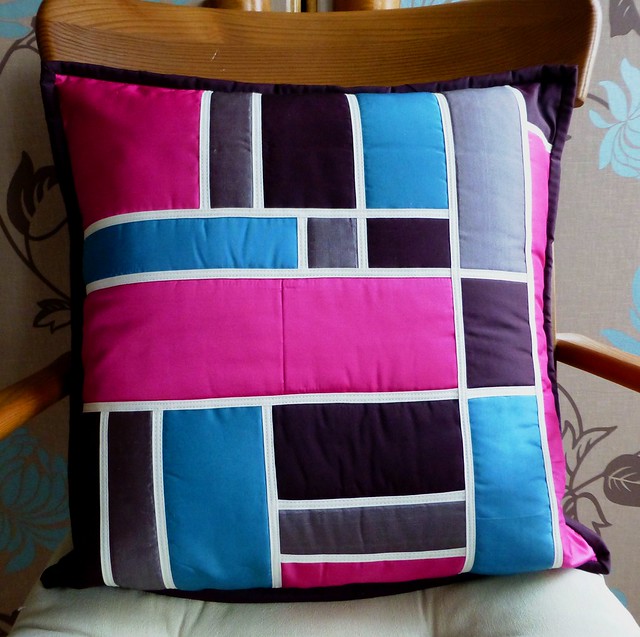
1. Make an improve block to your required size.  I made a 16" square panel for a cushion front.

2. Study the seams of your block to find out which ones will need bias tape first, and which ones have ends that will need to be covered over by another piece of bias tape.  Peel the back off the tape and start ironing on the sections that need to be sewn down first.  Make sure the tape ends reach right into the seams.

3. Baste the block onto some wadding, backed with calico/sheeting.

4.  Take your block to the machine and start twin needling the smaller pieces of bias tape that are stuck down.  You don't need to start or finish with a reverse stitch, just make sure you sew right to the ends of the tape.

5. Continue building up the layers of bias tape until all raw edges & seams are covered.

6. Trim off any excess wadding/backing.

7. Attach a cushion back and binding if desired.

8 & 9. Sit back and admire your handiwork!

Thank you for taking the time to read this tutorial.

I hope you have been inspired to try something new and have loads of Twin Needling fun!

Wednesday, 5 December 2012

Travel Sewing Pouch Pressies!

I have a few 'stitchy' friends I want to make for this Christmas.

So I thought my ever practical Travel Sewing Pouch would be just the ticket.

Travel Sewing Pouch Dec12 Travel Sewing Pouch Dec12 Travel Sewing Pouch Dec12 Travel Sewing Pouch Dec12

These pouches have now been filled with goodies are ready to be parcelled up and sent off!

And I've also got my Brit Bee Secret Santa pressie all sewn up too! 

Happy Wednesday!

Monday, 3 December 2012

Bee Blessed December Block

A new month already!  I'm struggling to keep up!

Thank you everyone for donating brilliant Kiss blocks for November to Bee Blessed.  We have at least 25 in so far, with a few more still to come!  You can see some of them here.

Following on from Trudi's brill idea to make some Patchwork Wheel blocks (Hugs) to go with our Kisses, I thought it would be good to set the Patchwork Wheel as December's block.

Hug & Kiss blocks for Bee Blessed

I appreciate how busy everyone is and will be this month, so please don't feel under pressure.  If you happen to have a spare 20 minutes to rustle up a block following this tutorial, then that is fantastic.  As before, please keep to one fabric for the O and white background.

Our quilt nominations list has had a recent influx, so we will be as busy as ever at our last Bee Blessed meet up of 2012 on 15th December.  The needs of folks for comfort and hope are as great as ever.  Thank you for being an important part of this much needed blessing.

I will soon be updating the Bee Blessed page with our 2013 dates, so you can get them into your diary!


Sunday, 2 December 2012

Fill Yer Boots!

This coming Saturday I'm teaching a kids' Christmas Stocking Workshop.

These are the stocking designs they can choose from:

Mini Stockings:

Christmas Stocking Workshop Dec12

Decorative & Scrappy Stockings:

Christmas Stocking Workshop Dec12


Or they can 'go large' and make a Wellie Boot sized stocking which Santa can really get stuck in to!!

Christmas Stocking Workshop Dec12

So all in all, I think we are going to have lots of stocking fun on Saturday!

Kids Christmas Stocking Workshop Dec12

I still have a few places left, so if you are local to Belfast and have a protege you would love to spend a day being creative with, drop me an email.