Saturday, 18 February 2012

You're Welcome!

My Welcome Wallhanging class finished this week.  

I love showing you what the talented ladies in my class have made!


There are 4 more amazing wallhangings not shown here.  Some of these ladies were beginners - didn't they do well?  I think the smiles say it all!

If you are interested in making this cute wallhanging for yourself or as a gift for someone else, the pattern is available in my Etsy shop.

Well, I gave up waiting on the bondaweb I ordered 10 days ago, and 'Carried on Regardless' with my Brit Bee Art Quilt.  I'm really pleased with how it looks so far.  Just need to do a wee bit of stitchery magic over the top and I'm finished.  

And today I have an afternoon of fun and frolicks with my Bee Blessed buddies.  I will be setting a new block for March, for any one who would still like to donate a block or two.  It's going to be a fun one, so tune in next week to find out more.

Two of my (noisier) kids are away this weekend.  I thought I would enjoy the peace & quiet but it just doesn't feel right.  I want them home with me!!!  What am I going to be like in a few years time when they actually start leaving home? Gulp!

Have a lovely weekend, whatever you get up to! 

Friday, 17 February 2012

Spray Basting Tutorial

Now that basting spray is all the rage, I thought I'd post a wee tute on how to spray baste a quilt.

I'm a complete convert of basting spray over hand basting (i.e. pinning & tacking). 


For me, it's a huge time saver and also makes the quilting stage easier. 

I know that not everyone likes this product or the methods in using it, but for those out there who want to have a go, you might find these tips and guidelines useful.

1.  Find a large enough surface to lay out your wadding (already cut slightly wider than your quilt top). 

I use my dining room table, however you could use the floor (if your floor is wooden/laminate/tiled, then you might need to stabilise the wadding with masking tape, to stop it slipping around too much).

2. Lay the wadding out first, followed by the quilt top (right side facing up).  Make sure the quilt top fits inside the wadding, and smooth out any wrinkles.

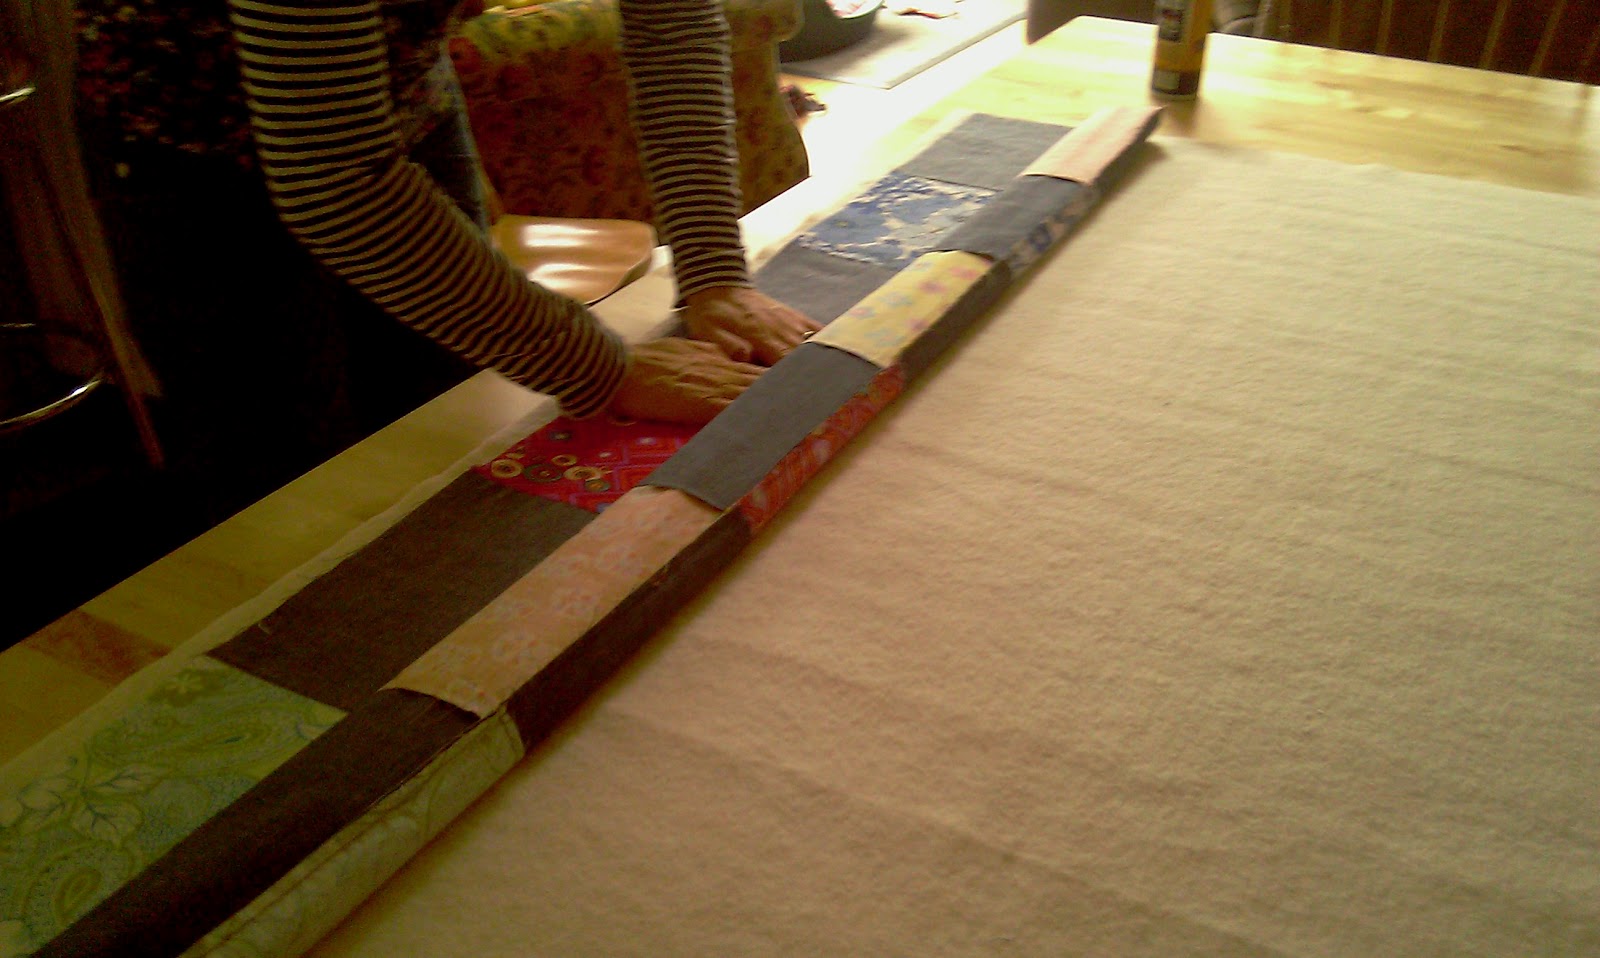
3. Start rolling up the quilt from the bottom to the top, keeping it straight and even all the way.


When you get to the top, carefully lift it off the wadding and lay to one side.

4. This is where I turn my wadding round so that I can fit the full width onto the table. The excess wadding hanging over the edge is resting on some chairs.


5. Time to spray!  I'm right handed, so I start spraying from the bottom right hand corner, working my way to the left hand corner, spraying approx. 12" in depth.


Hold the can approx. 12" above the wadding, spraying evenly along the wadding.  Try not to have too much or too little adhesive in one place.  Remember to spray right to the edges of your wadding.

6. Carefully position your rolled up quilt top onto the nearest edge of the wadding, placing it just inside the edges of the wadding.  Start smoothing from the middle of the quilt out to both edges.


7. Roll the quilt a short distance and smooth over it, working from the middle out towards the edges.  


Tip: Don't over-smooth the fabric or stretch it, just smooth it enough to get rid of air bubbles or wrinkles.  If you make a mistake, or get a wrinkle don't worry.  You can just peel the fabric back off the wadding and smooth it back down again.  There's no need to re-spray.

Also, keep a check on how your seams are lying underneath.  Feel with your hands to make sure that seams aren't flipping back the wrong way as they get stuck down.  They will cause lumps & bumps otherwise, which isn't good for quilting!

8. Continue in this way until you've covered the first section that you sprayed.  To find out where you need to start spraying the next section from, lift up the roll and it will stop at the edge of the first sprayed section.


9. Place the roll down on the stuck down section, and spray another 12" section across the width of the wadding, as before.  Continue rolling, smoothing & spraying until the quilt top is completely stuck down.


Tip:  To save my poor back from breaking during this process, I slide the quilt towards me with each new section that I spray and smooth, which means I don't have to over-reach.

10. Now flip the whole piece over, and repeat this process for the backing - laying it on top in position, rolling it up, and spraying & smoothing it on in 12" sections at a time.


11. Trim off the excess wadding/backing.  Now you're ready to quilt!


You will notice in the picture above that you get a wrinkly look to a spray basted quilt.  This is normal.  If you think of it like a vacuum packed bag, when all the air is taken out of it, all the layers stick together and create a slightly textured look.  This won't affect your quilting or the end look of your quilt. Provided there are no air pockets left in the quilt, the 3 layers will remain stable and won't move about.

Points to remember:

* The adhesive spray in no way harms your needle or machine during quilting.
* It comes in 2 sizes - the small tin (250ml) will easily cover 2 lapsize quilts. The large tin is 500ml. 
* There is a slight smell to the adhesive (despite it being described as odourless on the can), so use it in a well ventilated room.
* You must wash the adhesive out of your quilt when it is made.  However, for wallhangings and smaller projects I tend to leave it in as it gives a slightly more structured feel.
* You will need to wash down your table/surfaces after spraying, with hot soapy water.
* If using basting spray on smaller projects, keep an old shower curtain/sheet handy to spread out on your table when spraying.  This will protect your surfaces and can then be thrown into the wash after several uses and reused when dry.
* I haven't tested how long basting spray remains adhesive i.e. when you've basted a quilt, but don't get around to quilting it for a while, however I spray basted a quilt over a month ago and the layers are still stuck together! 

Personally, I will never return to pinning and tacking! 

This adhesive spray has taken a lot of the angst out of basting and quilting for me and my students.  

I hope you find this product as helpful as I have and enjoy this tutorial. 


Thursday, 16 February 2012

I Can Do Modern!

Just a few blocks to show you today!

First up, a couple of Bee Blessed blocks for our modern sampler quilt (we're meeting up this Saturday):

Pattern from the 99 Modern Blocks Book

Tutorial for this block here.
Next I've done a couple of blocks to add to my slow-growing pile of red/pink/aqua blocks, which one day will become a quilt!

Don't tell anyone but this was supposed to be 'Quartrefoil', I just didn't read the instructions properly!  Oops!

'Jacob's Ladder'
These are both traditional blocks, but I love the way they can be modernised with more contemporary fabrics & colours.

Jacob's Ladder is part of a series of biblical blocks that Colette is hosting from her blog. Join in with us if you fancy modifying some good ol' fashioned blocks.

And talking of blocks, all my Brit Bee blocks are now in! Yippee!

Poor Jo's blocks have had a dreadful time of it.  The Royal Mail sorting machine decided it was lunchtime and tried to eat Jo's blocks, didn't fancy the taste of them so spat them out again and returned them to Jo minus her siggy!  What a palava!

But they are safe and sound now in the January Brit Quilt family of blocks.  I will take a pic when the sky ever changes from grey here!  Just as soon as I get the 2 remaining siggys (hint, hint - you know who you are!!) I'll get to sewing up the front.  I really love how this is looking so far - squeeee!

Wednesday, 15 February 2012

Quilt for Beginners

Well I beavered away all day and got my Beginners Quilt finished last night.

Finished size approx. 58" x 68"
I used a colourful duvet cover for the back.
 

This simple design will provide my beginners with a safe introduction to quilt making, as well as having fun with colour placement.

I also managed to get the cushion made for Sarah's Sew Get Started Beginner series tutorials, and my fqs from The Fat Quarter Shop arrived so I got those cut up and I'm now ready to start piecing my nephew's quilt.

Interestingly, I ordered these fqs from USA on the same day I ordered bondaweb from the UK (Ebay).  I'm still waiting on the bondaweb!! 'Nuff said!

Btw, I'm writing up some class notes on how to spray baste a quilt & am happy to put this up on my blog as a tutorial if anyone is interested? 

Hope you are having a great half term week.

Monday, 13 February 2012

CUTS! CUTS! CUTS! (at least not the austerity ones!)

I feel like all I've been doing in my sewing room lately is cutting!

As part of the lovely Sarah's Stained QAL, there are 11 fqs to cut up into a miriad of ways, before we start to put blocks together.  

I've got 6 cut, 5 more to go!


This will be an 18th Birthday Quilt for my nephew!
I then started cutting up the fabric I got for my other nephew, who turns 18 in May.

These are mostly Surf Time by R.Kaufman with a little Swoon thrown in, kindly donated by another lovely Sarah.
I'm really liking how this is turning out, despite initial reservations about it being too floral!  I'm waiting on 2 more fqs to come from The Fat Quarter Shop, and then I can start piecing . 

I also cut up an entire Cosmo Cricket Circa 1934 layer cake, pieced it and hastily fell out of love with it!  


I'm experimenting with a simple quilt construction for my beginners class in May and thought working from a pre-cut would be a great place to start.  But this particular collection definitely needs solid sashing to break it up!  Live and learn! 

So with no more money to waste spend on fabric, I started cutting 10" squares from the oodles of denim-esk fabric I have, with some of my charity shop finds and other stash fabrics.

Not the finished layout!
I'm liking this one much more, and can even see me finishing it off with some simple hand quilting in the solid squares.

And finally, I've cut out the pieces for my cushion tutorial which will be featured on Sarah's blog next month.

Phew!  What a lot of cutting!  (And what a lot of Sarah's!)

Just need to get sewing now!

Sunday, 12 February 2012

Making Memories!

The day was wonderful!  Thank you all for your lovely well wishes!

I'll let the pics speak for themselves.


Saturday, 11 February 2012

The Big Birthday Weekend!

This is it!

The big birthday weekend in the Hollies' Household.

 Today my dad turns 70, which we are celebrating tomorrow ....

Happy Birthday Dad!
... and tomorrow no.2 daughter turns 13, which we are celebrating today! 

Butter wouldn't melt ...!
Happy birthday my lively one!
With me so far??

The young 'un has had friends sleeping (??) over last night, and then off to MacD's and the cinema later today!  

Tomorrow, we all pile down to my sister's for a joint birthday party.  I will be a quivering wreck by then as I will be handing over the Civil War quilt I made for dad, with contributions from all the family.


No one else in the family has seen the finished quilt yet, apart from my hubby and kids of course!  So it will be a big reveal for all of the family gathered together.  

Sadly my brother and his family won't be there as they live in England.  But no doubt cameras will be snapping away and lots of pics downloaded and emailed.

I will bore you with pics of the special day after Sunday!

Have a great weekend!